
If you have the question, how to start a blog? You are at the right place. Here you will learn to create your first blog by yourself.
We have tried to go as detailed as possible with images to handhold you throughout the process. If you still have any questions, feel free to use the comment section, we will make sure to guide you.
Before we go ahead with the article, we must understand that blogging is not just a hobby anymore, it is a real business and there are blogging makes millions of dollars.
So, you need to take your blogging business seriously and try to do the right things from the very beginning.
Here is what you will learn from this article.
Table of Content
A brief introduction to these two things would make you understand better about creating a blog from scratch with BlueHost.
What is a Blog?
A blog is nothing but a discussion or a collection of information sites that you can publish on the Web. This thing could be mostly presented in an informal manner.
Blogging is an act of creating articles to share information in one’s mind to the world through the internet.

An important and interesting fact about blogging is you can enjoy doing work that you like more, and you can earn too.
This profession doesn’t need specific timings, and you can work according to your will.
Usually, a blog can be owned by an individual or even a group or a company. You can share anything that is informative.
You can add things to images, videos, animations, and articles on your blog.
A person who creates or writes content for a blog is known as a blogger. Blogs contain features like comments and links.
These things may increase user interactivity with individuals.
Things to Know Before Starting a Blog

Earning while sitting within the comforts of your home simply by using a laptop and an internet connection; seems wonderful, doesn’t it?
Everyone who plans on starting a blog works with the motive of earning a passive income; and why not?
As Warren Buffett puts it, “If you don’t find a way to make money while you sleep, you will work until you die.”
In today’s information age, creating engaging content and using it to reach a huge audience has become easier than ever before.
There are some challenges that every blogger faces on the journey towards establishing a successful blog.
Blogging is an ongoing process where the more you progress, the more you learn.
If you’re planning to start a blog, here are some important points that you need to consider:
Topic of Your Blog (Blog Niche)
This is the most important point that you really need to give a thought about. You must select a topic that you are passionate about.
If you select a topic that you are not interested in, there is more than a 90% probability that you will not continue with it, and eventually, you will fail as a blogger.
So, choose your niche wisely.
For example, if you are interested in cooking, start a food blog. If you are interested in fashion, start a fashion blog and so on.
Monetization Options
This is another important factor to look at. Check for the monetization possibilities around the blog topic you choose.
Check for good affiliate programs, advertisement possibilities. If you want to monetize your blog with Google AdSense or similar ad platforms like AdSense, check what kind of CPC is offered around the keyword that you are going to write about.
Your Target Audience
Knowing your target audience well can be a great help. You can create the content that your audience is expecting from you.
Though it is vital to write about the topics that appeal to you but writing about the interests and expectations of your target audience is primary.
People visit your blog in search of a solution to their problems. Identifying your target audience and providing a solution to their problems is the key to a successful and sustainable blog.
One of the most important factors determining audience retention on your blog is the level of value they derive from your blog.
Your audience will only visit the blog again if the solution you’re offering to their problems is valuable to them.
For instance, if you’re a travel blogger and you keep bombarding your audience with promotional content, they may ultimately lose interest.
On the other hand, if you share your experiences and informative facts about different places, your audience may find it useful and keep coming back for more.
Your blog should offer a combination of informative and engaging content that makes people want to visit it again.
A great way to get to know your target audience is to ask them questions directly with lead capture forms. Having a tool like HubSpot forms will allow you to collect valuable information on your website visitors.
Relevant Image Sources & Use of Social Media
Visual content is a vital aspect of modern blogging. From informative graphs to visually appealing statistics, images help you in providing a lot of information without saying much.

Along with adding up to the readability of your blog, inserting relevant images also contributes to the SEO of your blog with the help of ALT tags and image titles.
A mistake that most bloggers make is expecting quick returns. A new blog takes time to become popular among the intended target audience, and social media makes the process easier.
There are various social media handles that you can use to market your blog depending on your blog’s niche and target audience.
Social media sites such as Facebook, Twitter, Pinterest, etc. can be huge traffic drivers to your blog.
Plan the Financial Aspects
It is completely okay to spend money before you start making money online. Initially, when you start blogging, aspects such as content, promotion, development, etc. will cost you money.
It is essential therefore to plan these financial aspects properly before starting your blog. Make a spreadsheet and write down every little expense to be incurred, in that spreadsheet.
This will give you a clear idea about the investment needed and will help you in creating a timeframe to start receiving returns.
Sourcing Your Content
The content on your blog is the most important part of the whole process and will go a long way in determining the success of your blog.

Decide in advance how and from where you will source the content of your blog. Initially, you can write it yourself, but eventually, you will need a team of content writers to keep the regular flow of content going.
Well, let us put it simply! Deciding everything in advance helps you to progress smoothly on the road to your blog’s success.
You may face some obstacles while starting off with your blog, but if you keep these core issues in mind, the road ahead will be smooth indeed!
We have created some articles related to blogging; I’m sure those articles will help you to grow your blog.
Now let’s check how to create a blog with BlueHost
What is BlueHost?
BlueHost is one of the oldest and recommended web hosting companies, often touted as a leader in web solutions among other service providers.
BlueHost is found to be the largest web host that hosts around 1.9+ million domains along with its sister companies like HostMonster, FastDomain, and iPage.
This hosting service is one of the favorite services, which is rated high by its users. People using BlueHost say that the servers of BlueHost never get crashed, and they are found to be very much consistent in performance.
After reading these two introductory parts, you might have got the basic knowledge about them. Now, I’m going to explain to you the process of creating or starting a blog from scratch with BlueHost.
Another important thing in making a blog is WordPress. WordPress is a CMS that you can use for optimizing the look and functionality of your blog.
It is known that the combination of WordPress and BlueHost is found to be more powerful and professional too.
So, this article would show you the clear-cut steps to start a blog from scratch with BlueHost like registering the domain name, hosting, installing WordPress, and finally creating and optimization your blog using Plugins & other settings.
Now, let us discuss the detailed steps which are involved in creating a blog from the start using the Bluehost service.
Follow these steps properly, and you will have a functional blog with BlueHost in a short span of time.
A Detailed Step-By-Step Process to Create a New Blog With BlueHost
Registering the Domain Name and Hosting
A domain name is your online identity; a string of letters that could be used to define a dimension of authority or control within the web. It is a part of the link address which belongs to a particular domain.
In simple words, the domain name could be anything that is assigned by the admin of a particular domain according to its functionality, or even much more categories.
It is used to identify the Internet Protocol (IP) Addresses. Domain names are utilized in the URLs for opening certain web pages or sites.
These domain names are formed using a set of rules and procedures of DNS which is abbreviated as Domain Name System.
So, if you register any name in the DNS, then it is considered to be a Domain name. Now, let us look at the procedure for registering the domain name of your blog.
You need to make sure that the domain name you select is brandable and easy to remember. Try to avoid very long domain names, you can use this domain name generator to find quality brandable names.
Step 1: Get Free Domain Name from Bluehost
For registering a domain name for your blog, you have to open the official site of BlueHost. For that, enter the link www.bluehost.com in the address field of your browser.
The URL will open up the homepage of the BlueHost, and it would look as if shown in the image.
This page would show you the latest offers for the web hosting service provided by BlueHost.
The features of BlueHost include Free domain, free site builders, one-click WordPress install, and very importantly 24/7 support from executives.
BlueHost’s customer support is an important benefit of using it. They will provide you the support and service efficiently and that too in a very short period from the moment you request any.
You could see a green-colored button mentioning “get started now” which you can find on its list of features. Click on the visual button to get into the process of registering the domain and more.
Check the availability of a domain by using the domain checker tool below.
Step 2: Select a Hosting Plan
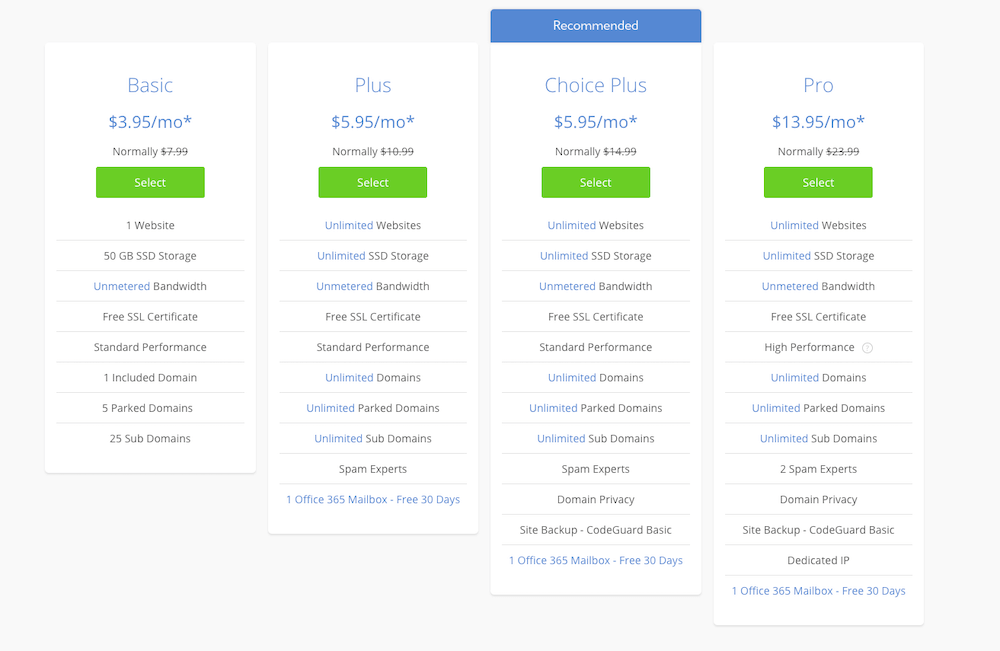
Here are the Bluehost pricing packages. The price can be even lower depending on the offers available at this point in time.
You can explore the features and benefits of each package. It mainly contains three different packages namely Basic, Plus, and Pro.
For the freebies, you need to buy the yearly package at once.
BlueHost packages like Plus and Pro could be very useful for well experienced and professionals. If you are a beginner, then try using the Basic pack which could give you an idea of how to use the Plus and Pro packs in the future.
The Basic pack is also not less, and it has all the essential things for starting a blog.
Here, in the process, we are going to click on the basic package for this tutorial.
For this, you could see a “Select” option at the bottom of the package list. You have to click on that button to choose the desired package.
You can choose any of these three packages according to your needs and budget.
Step 3: Select a Domain
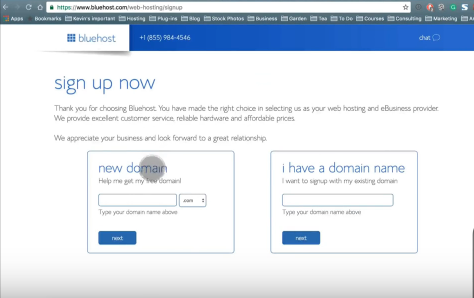
Once you click on the SELECT button of your desired package, you will get this page as is shown in the above image. This page prompts you to Sign up.
It has two things being exhibited.
One thing is “New Domain” and the second is “I have a domain name.” In these two fields, you have to enter your desired domain name in the “new domain” option and click on the “next” option.
Step 4: Create Your Account
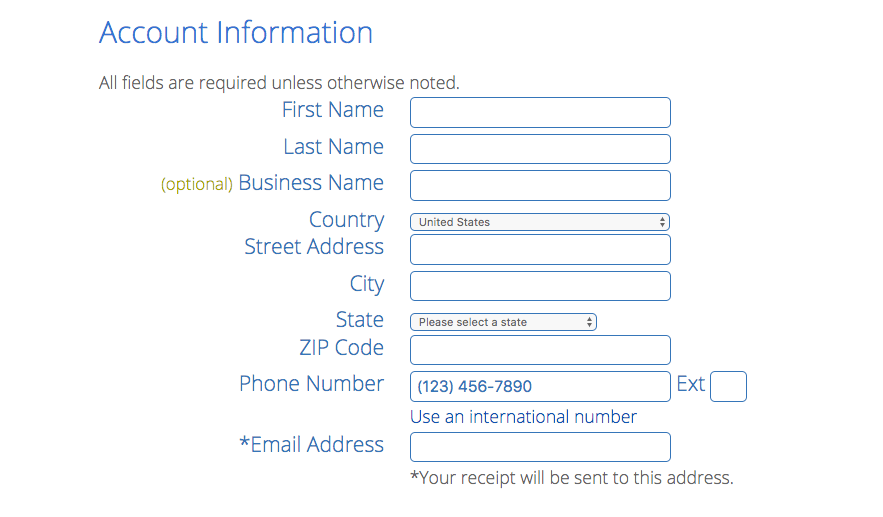
After you tap on the next, you will get a page to “create your account.” An important thing that you have to make sure of is the notification by BlueHost.
If the Domain name which you have entered in the previous step is unavailable, then it would notify you of the existence and prompt you to try another name.
If the domain which you entered is available for use, then on this page you can see a message “Congratulations! The domain you have requested ‘xxx xxx xxx’ is available” thus, you can step forward to the next step.
The next thing is the account information. You have to enter your details like your First & last name, business name, country, address, phone number, and more.
Pro Tip: Search and finalize the domain name in advance to simplify the registration process.
Step 5: Final Package Information
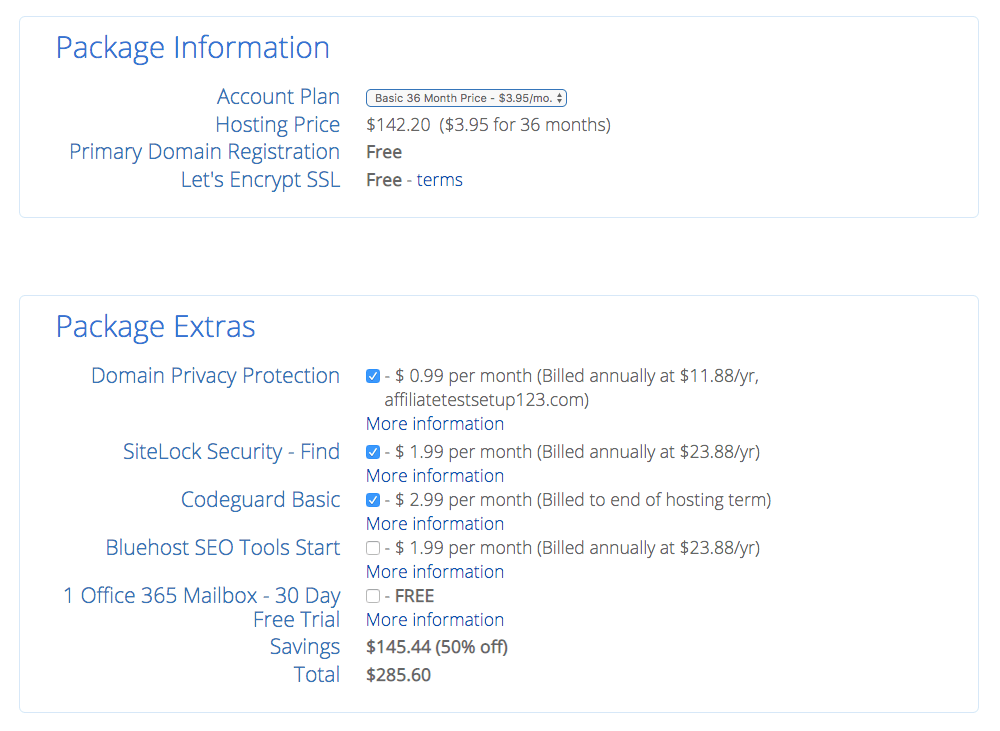
After entering your details, you could see the “package information” consequently on the same page. You have to select the account plan, i.e., whether Basic, Plus or Pro. We are selecting the Basic package plan.
After you choose your desired plan, you have to uncheck the other checked box which you could find the account plan option.
Step 6:
Sequentially, after finishing the package information section, you could go on to the payment information. It would contain fields for entering the credit card number and more.
You have to enter your card details in the recommended fields for the payment.
After entering all these details, just scroll down.
Step 7: Add Payment Information
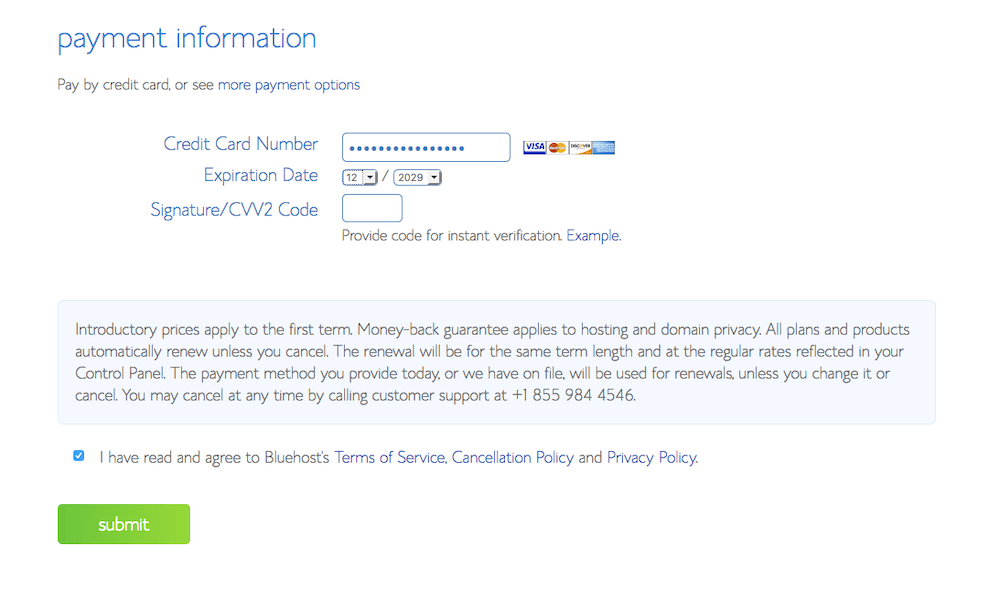
Add your credit card details and proceed.
You have to enter your card details in the recommended fields for the payment.
After entering all these details, scroll down.
Step 8:
Once you scroll down, you could find an agreement confirmation checkbox regarding the privacy and policy of BlueHost.
You can go through the statement by clicking the link provided and checking the box provided for confirmation.
Once click on the checkbox, the next thing which you have to do is click on the SUBMIT button which you can find at the bottom of the page.
Step 9:
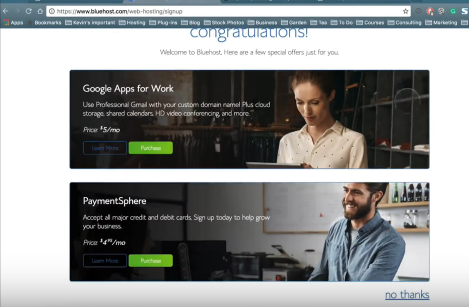
Once you click the SUBMIT button at the bottom of the page, it will open up a page saying ‘Congratulations,’ and it would exhibit some more offers for you.
You can make use of it else just click on the “no thanks” option which you can find at the right bottom of the page.
Step 10:
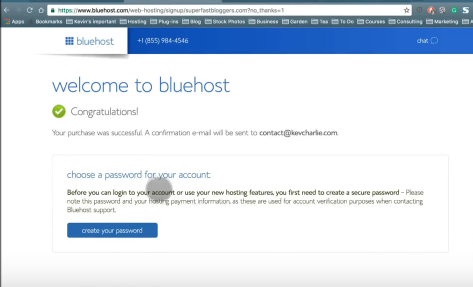
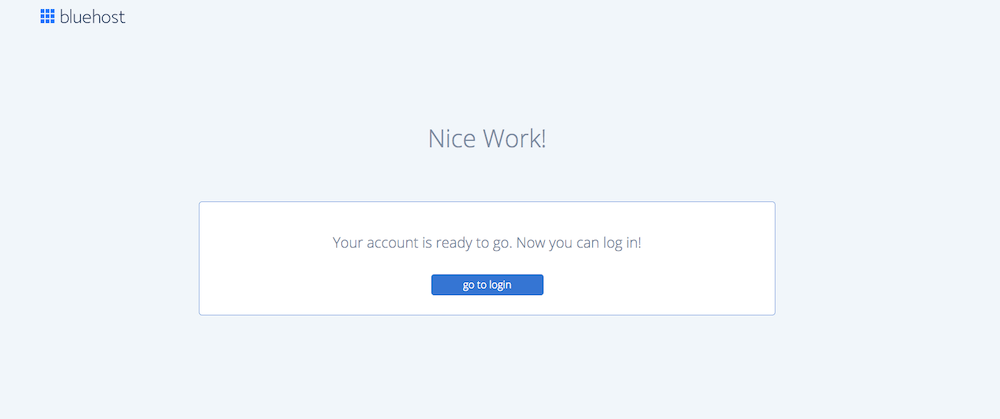
At the moment you click “no thanks” option, it will open up a page showing the message “Welcome to Bluehost,” and it also notifies you that your purchase was successful and will send you a confirmation mail to the email ID which you have given during the process of registration.
On this page, you can also see an option for choosing a password for your account. This process has to be done before you login to your account.
You could see a visual button mentioning “Create your password.” Just click on that button.
You can also preview your account details by scrolling down on this page.
Step 11: Create a password
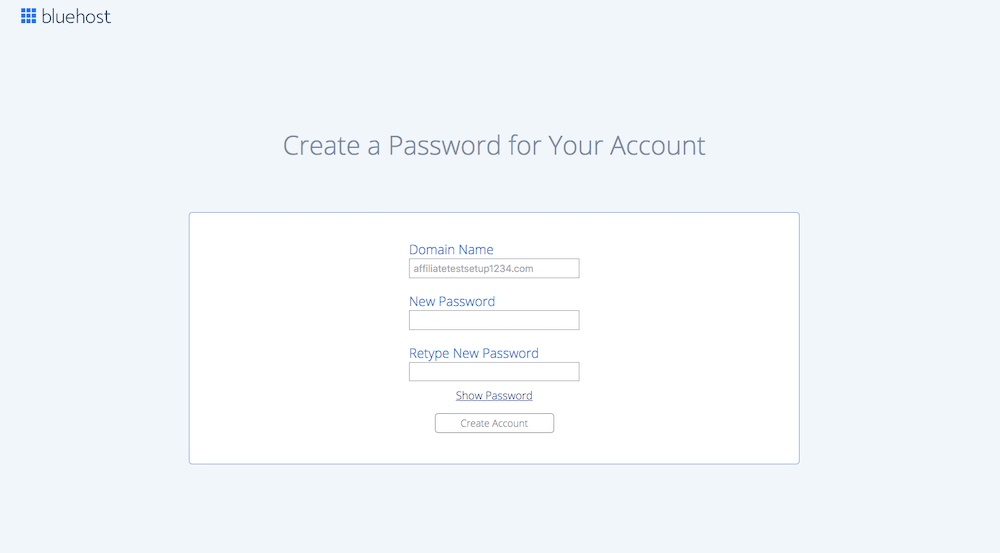
After clicking on the “Create your password” button, it will open up a page as is shown in the above image. This process has two fields such as a new password and retype new password.
Below that, you have two hyperlinks mentioning display character and suggest password.
Display character can be used to show the password which type while suggest password will help you by providing a password by default.
You can use this option, or you can type your own thing and click on the NEXT button.
Before you click next button, you have to check the box provided to accept the privacy policy and terms of service.
Note down the password or use software like LastPass to save all your passwords, not only this, securely. It’s free of cost.
Step 12:
The image shown above is how it would look when you click on the Login button. This screen is the dashboard of BlueHost which you could after you login to your account.
Installing WordPress on Bluehost
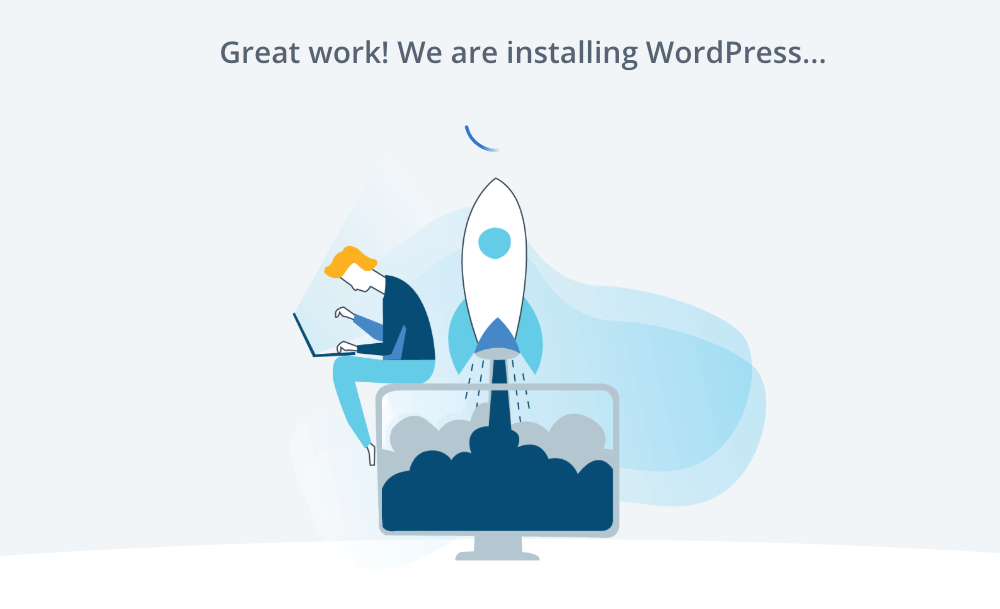
The process of installing WordPress is very simple on BlueHost. In fact, it will be done automatically.
When you visit the My Account page on BlueHost, you will see that WordPress is already set for your site.
And you will be asked to pick a theme for your site. In this step, you can select any of the themes and proceed.
You don’t need any technical knowledge to create a WordPress site on the Bluehost platform as WordPress will be auto-installed for your site.
Selecting a WordPress Theme
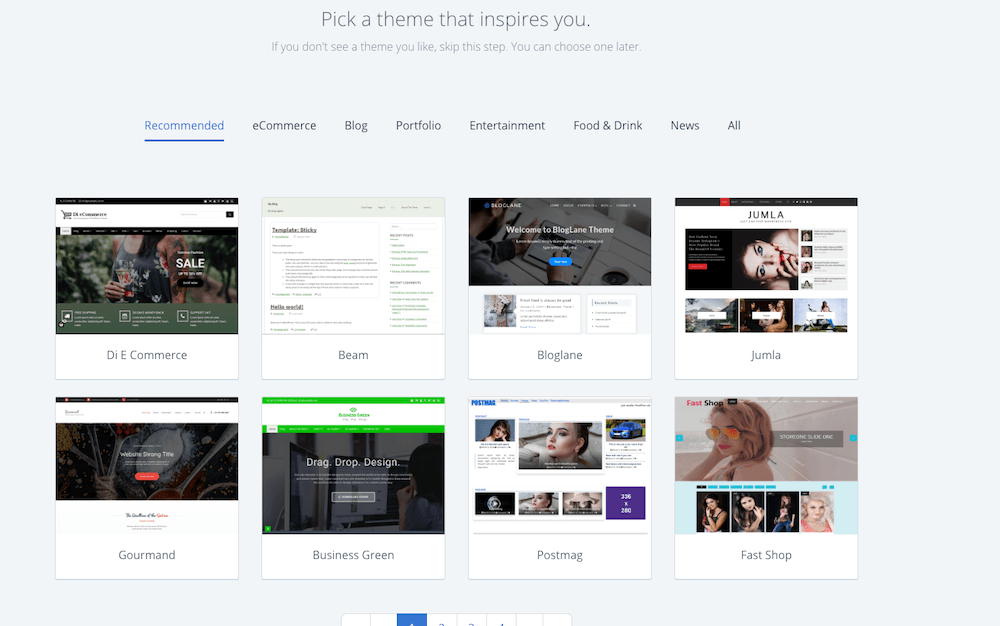
To make your blog look good and professional, WordPress provides you with various themes for setting it to your blog. There are a vast number of themes that are available on the web which can be used to customize the look of your blog.
There will be all different types of themes that you can choose from such as Magazine, food blog, Designer Blog, Video Blog and much more. One has to choose according to their need.
According to the category, each theme would have distinct functionalities. For example, if you are going to choose a Food blog theme, its functionality would be surrounded in regards to food and recipes.
Apart from them, there is a number of common themes too which you can use it for multipurpose uses. Some of the themes are also available for free on the web.
So if you are a beginner, try some of the free themes and make the little experience before you go on to the pro versions.
Free Vs Premium Theme
You will get the option to choose from thousands of free WordPress themes around the WordPress community.
But…
The question is should you go for a free theme?
The answer is no. There are a number of reasons why you should not use a free theme.
Generally, developers offer free themes just to attract more users for their premium themes.
Selecting the Right Theme
Selecting the right theme is very important for your business. You need to make sure that the theme you are selecting offers you all the modern features, it loads quickly and it is customizable.
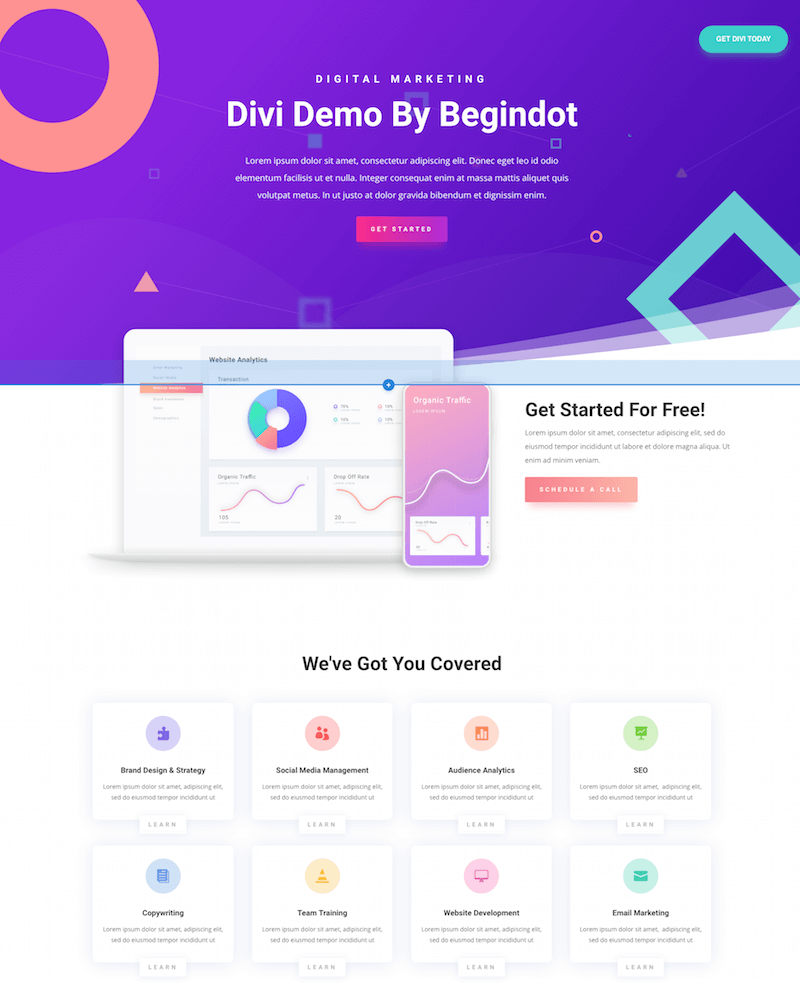
At Begindot, we recommend the Divi Theme which is one of the most popular WordPress themes in the market.
Here is why I think Divi is the best
Get 20% Discount on Divi Theme
You can get a 20% extra discount using this link. Once you get the theme, you can install it on your site.
Follow this process.
Go to WordPress admin dashboard > Appearance > Themes and click on add new.
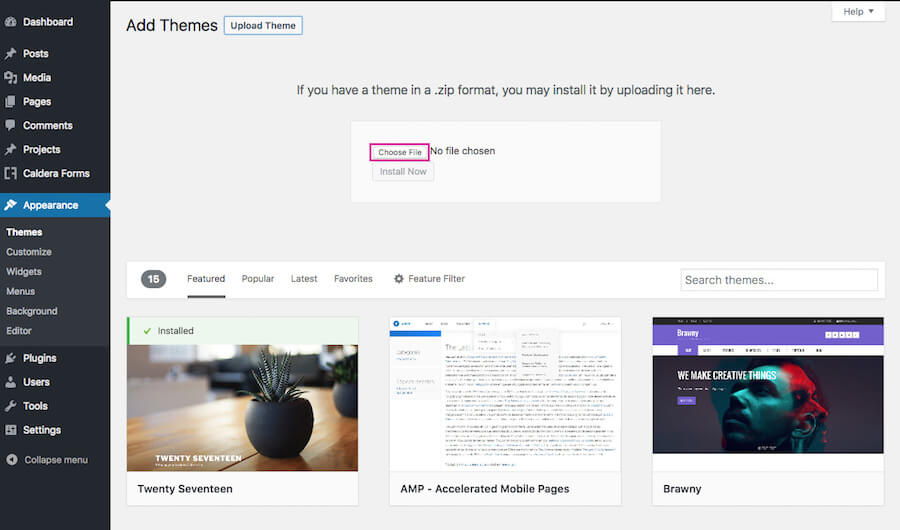
Now, select the Divi.zip file from the package you have downloaded from ElegantThemes.
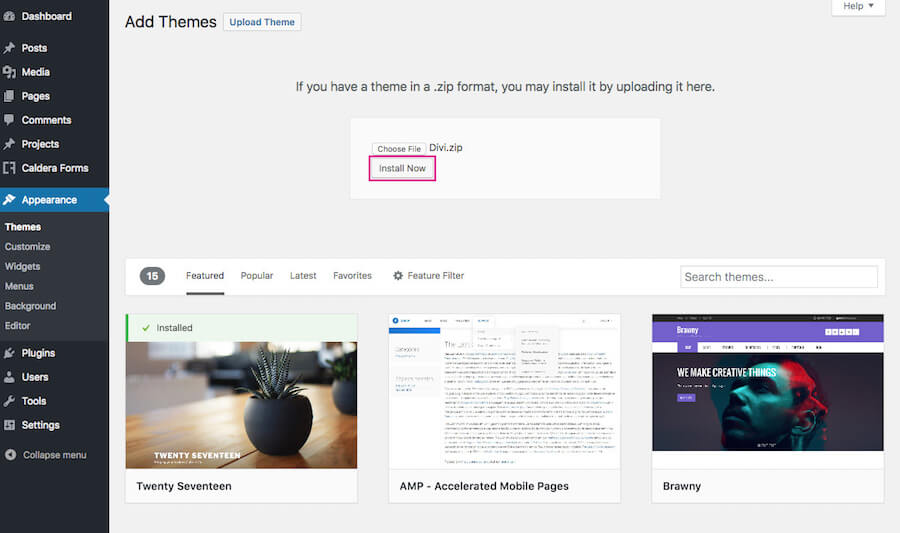
Install and activate the theme and get started with the settings. We have written a detailed review of Divi Theme to make sure that you have all the details and understand why we are suggesting Divi theme for your site.
Create Important Pages
Once your site is ready and you have done all the design changes as per your need. The next step is to create the important pages on your site.
Here are the must-have pages
Install the Important Plugins
We have a separate article on the important WordPress plugins for a blog.
Here are some of the must-have plugins on your site.
01. Yoast SEO
You will need an SEO plugin on your site so that you are able to optimize your blog as well as the individual posts that you publish.
Yoast is the most popular SEO WordPress plugin that offers you a simple option to optimize your website.
Another advantage of the plugin is the on-page SEO guide. When you create a blog post, the plugin will handhold you by suggesting what you need to do in order to make it more SEO-friendly.
Write your post, then add the meta description and the focus keyword. The plugin will analyze your page and show you if you need to make any changes.
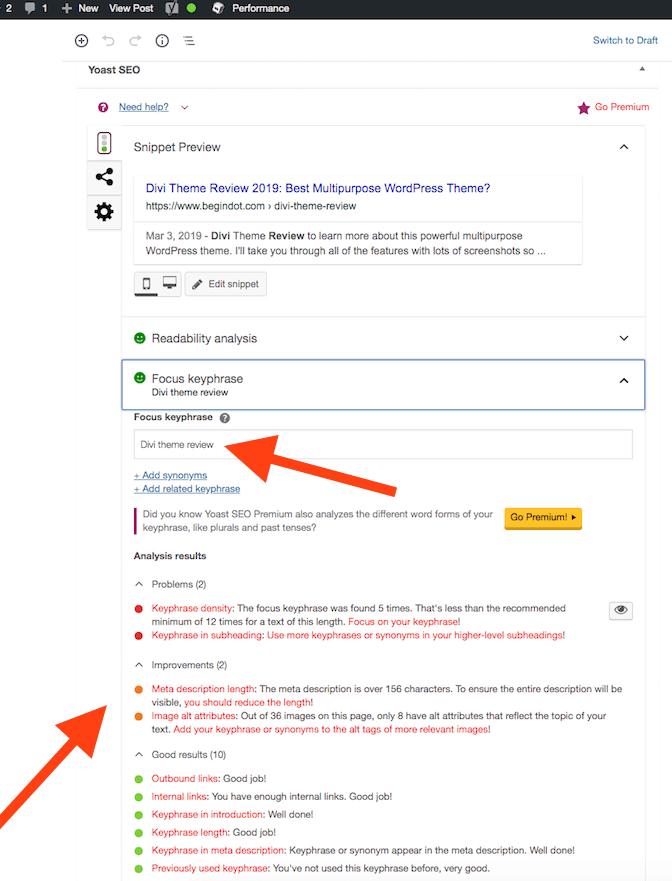
The on-page analysis is a great feature for
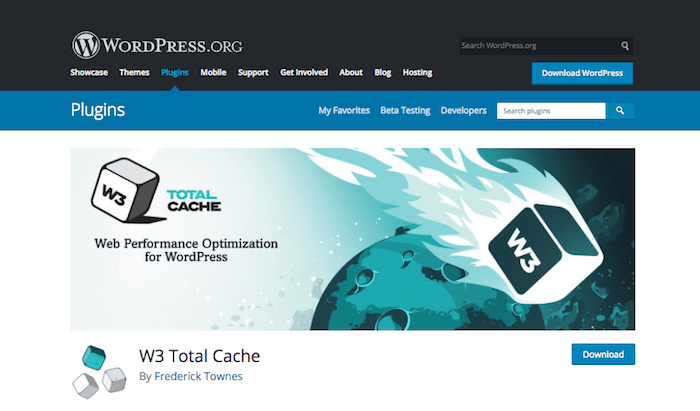
02. W3 Total Cache
If your site doesn’t load quickly, you will surely lose your visitors and keyword ranking as well.
You will need to use a quality cache plugin that will make your site faster by creating a cached version of your pages.
Get W3 Total Cache here.
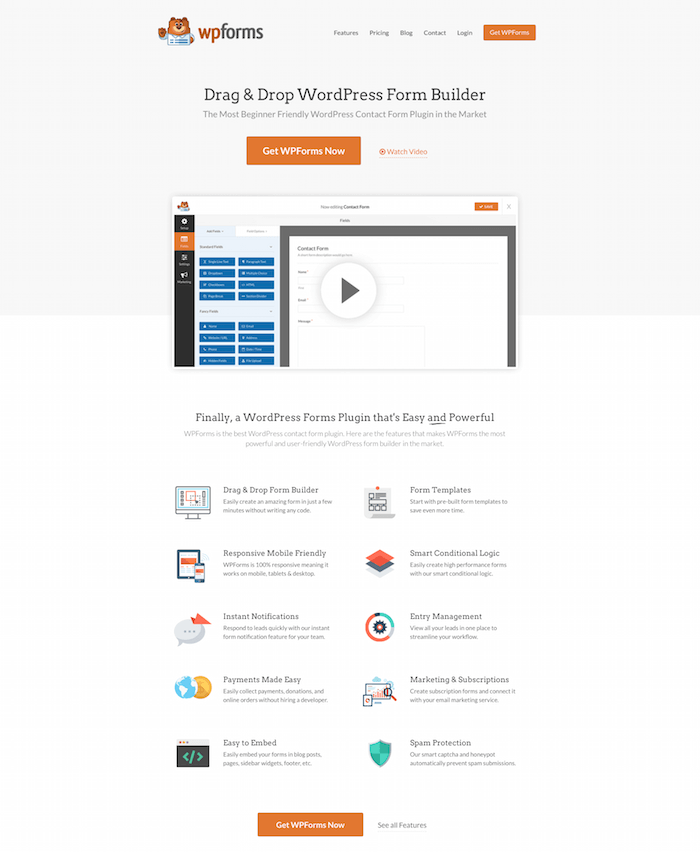
03. WPForms
You will need to create a content us page on your site as mentioned earlier in the post. The WPForms plugin offers you a simple option to create any kind of form on your site with drag and drop form builder.
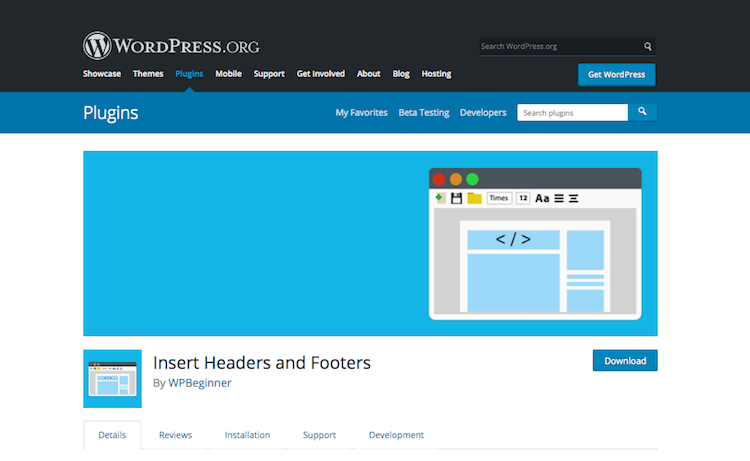
04. Insert Headers and Footers
Insert Headers and Footers is a very simple yet very handy WordPress plugin that makes it very simple for newbie users to add custom code in the header and footer section of your site.
05. OptinMonster
Email list building is very important for
OptinMonster is one of the most comprehensive email subscription

06. Bloom Plugin
Bloom is another very popular email subscription plugin. We have already mentioned the Divi theme above in the theme selection part.
If you are going for the Divi theme, you don’t have to buy any separate email opt-in plugin as you will get the Bloom plugin in the bundle along with the theme.
Bloom plugin is extremely powerful and flexible. We have published a detailed review here.
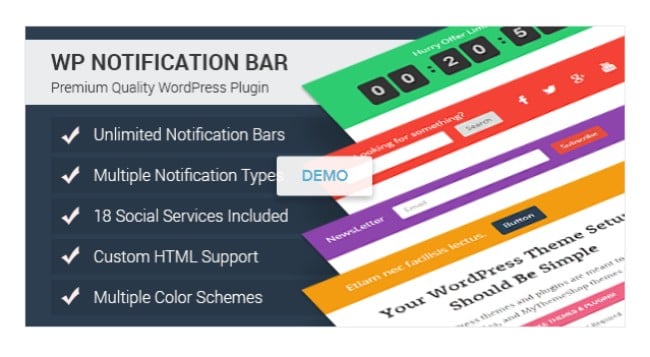
07. WP Notification Bar Pro
A notification bar can increase the conversion on your site to a great extent. You can use a notification bar in the header or footer section of your site to display any special announcement, as an email option or to increase the social following of your site.
WP Notification Bar pro is one of the best notification plugins that will surely increase the overall conversion of your site.
Drive Traffic (SEO & Marketing Tools)
SEMrush
Once your blog is ready, you will need traffic because without traffic you are not going to make money.
SEMrush is a tool that will be your best friendly throughout the process of optimizing your site and creating the right kind of content that can drive traffic and increase revenue.
You can use SEMrush to
Read this detailed review of SEMrush to know more about the tool.
SEMrush is an SEO suite that offers a number of different toolkits that you can use to grow your blog. You can have complete control over how you wish to grow your business.
Knowing what your competitors are doing is a great advantage. We all know how backlinks are important for any site. (Good quality backlinks)
Now, think about having complete details of each backlink of your competitor. You can easily find all the details of the backlinks and replicate those for your site.
And when it comes to creating great quality content, the SEMrush SEO content template will make the process easier for you.
To find the details of a site, you just have to log in to your SEMrush account and make a search for the domain that you want to analyze.
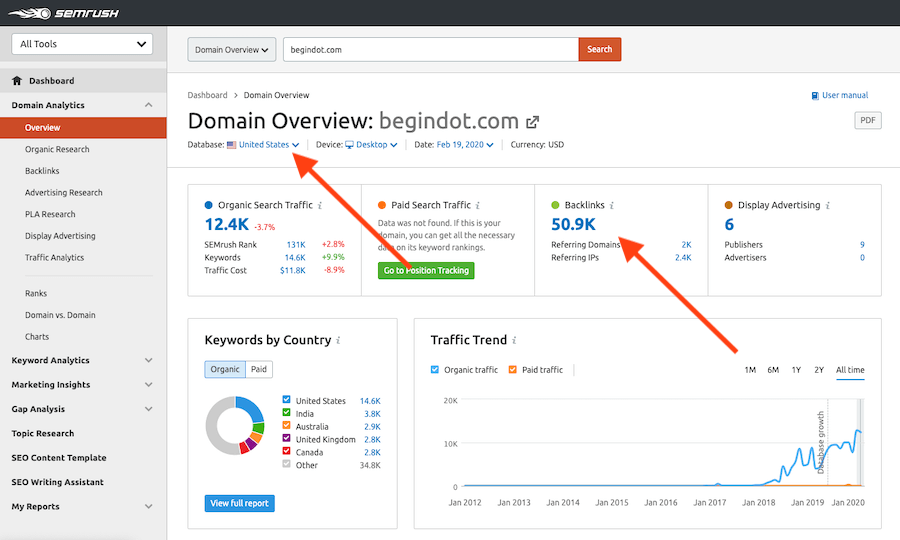
As you can see, it immediately gives you a summary of all the important data about your site. You click on those and dive into details.
HubSpot All-in-One Marketing
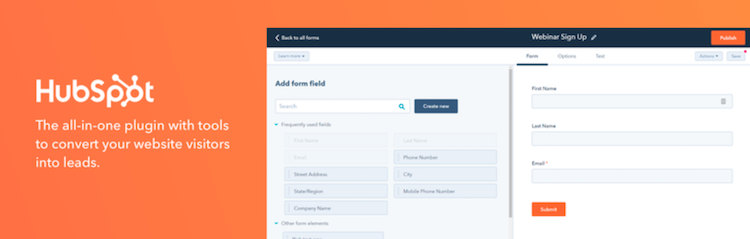
To get your blog to the next level, you will need a solid marketing strategy and the right tools to support it.
HubSpot All-in-One Marketing offers all the free tools you need to do marketing on your WordPress website.
It allows you to create lead capture forms and popups, add a live chat to your site (even chatbots!), and it sync all of your contacts’ information in a CRM so you can stay organized.
Conclusion
The above-mentioned detailed steps are involved in starting a blog from scratch using the BlueHost web hosting services. We hope you found our tutorial useful.
The important things behind creating a blog include selecting the right domain name, right hosting service and using an effective theme.
These are the vital factors that do matter in the growth progress of your blog. This article might have shown you only a little in the fact of creating a blog.
There are other vast things that are necessary for optimizing your blogs. Another important component that you can include using for optimizing your blog is plugins. Plugins extend the functionality of WordPress blogs.
Some of the essential plugins which you can utilize for the progressive growth of your blog include Yoast SEO, Black Studio Tiny MCE widget, page builder, and much more.
You can become an
All the best!
FAQs
01. Do I need to buy a domain for my blog?
No, with every Bluehost account you get a domain name free. Be careful and conscious while selecting your domain name because it is important to have an easy to remember and brandable domain for your business.
02. How long it is going to take to create my blog?
As explained the process of creating your blog is not very complicated. Even a complete newbie user can create a blog by following this step-by-step process.
It should not take more than a couple of hours for newbie users.
03. Is WordPress free to use?
Yes, WordPress is completely free. You just have to pay for the hosting, the theme (design) you use for your site and if you are going to use any premium plugin then you have to pay for that.
04. Can I use a free WordPress theme?
You certainly can. There are hundreds and thousands of free themes available for anyone to use. But if you are serious about making it big then go for a premium theme like Divi that we mentioned above in the theme section.
You will never get the kind of updates, features, support for a free theme that you can expect while using Divi or other similar premium themes.
05. How long it is going to take for me to make money?
Now, this is a subjective question. There is no straight answer to this question because it might take a few days for one user while it can take months for others.
The important aspect is it create good quality content and monetize your site in the best possible way.
06. What is good quality content?
You are trying to find an answer to something, you make a Google search and land on a blog post. After reading the post, all your queries are answered and now you have a clear idea about that topic.
07. What should be the word count of my post?
You know that better than anyone else. There is nothing called an ideal content length. You will find content with 200 words ranking at the top while a post with 5k words might struggle.
The idea is it fulfill users’ intent. If you can cover a topic completely answering all possible questions in 1000 words where is no need to make it 2000 long just by repeating your ideas.
08. How often should I post?
It is good to post as often as you can. If you can post daily by maintaining the same quality then go for it. If it takes one week for you to write a good quality post, then stick to one post a week.
