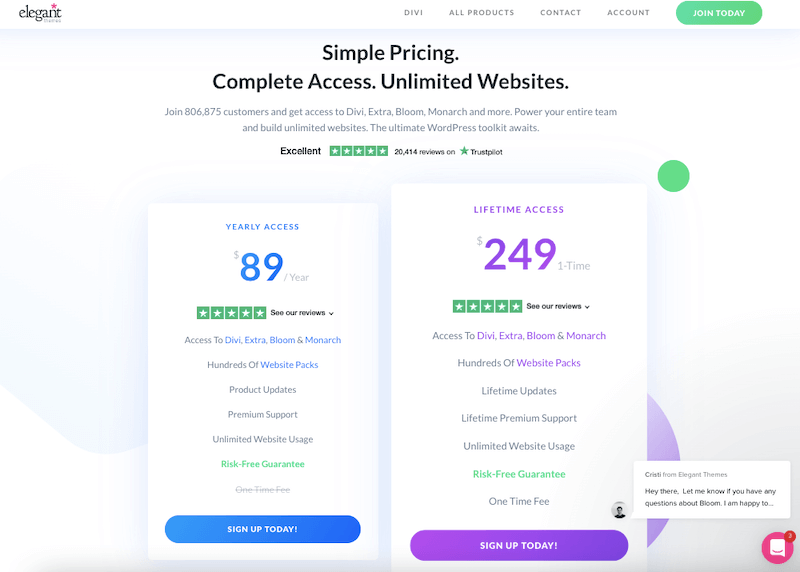
Bloom is one of the leading email opt-in plugins for WordPress from theElegantThemes store. It’s a quick, simple and a comprehensive email marketing plugin that will surely boost your email list.
There are some amazing email opt-in plugins which are available for WordPress users, and you can make your choice accordingly to your requirement.
In this post, we will stick to the Bloom plugin and see how it can help your blog and revenue growth over the time.
We all know about the search engine algorithm which is changing continuously, and even the best of sites can get impacted at times. We came across such examples in the past, if you keep an eye on the SEO related blogs you will get a fair idea about the latest updates and how it works.
So, the email list of your blog is extremely important because it can bring in the traffic whenever you need irrespective of how the SEO changes impact your site.
If you have not started collecting emails on your blog, you must start it now because as it is popularly said the money is in the list.
I would say, investing in a quality email opt-in plugin is a must for every blogger because your email list will be one of the most important assets of the time.
When it comes to email list building, the pop-up plugins are very popular and used by most of the top bloggers and businesses because they can capture your visitor’s attention instantly.
Before you plan your email opt-in form, one of the most important point to consider is; how and what you are going to offer them in the opt-in form; because that will all the difference about conversion.
If you are in a product business, you can probably offer some discount if they provide you their email; if you are in a content-based business, you can offer them a quality eBook for free. There are some ways to get their attention to your email opt-in form; you can do some A/B testing to make sure what works the best.
Bloom plugin is created by the popular ElegantThemes team, they are in the WordPress business for a long time, and Bloom is one of their main products.
As ElegantThemes works on a membership-based model, you get access to all their themes and plugins when you go for this one plugin including one of the most popular WordPress themes of all time; the Divi Theme.
Bloom is one of the most comprehensive lead generation WordPress plugins that offer you an amazing collection of email opt-in templates, placement options and high flexibility regarding design.
Bloom Email Opt-in Plugin Overview
Why Use The Bloom Plugin?
There are a few simple answers to this question.
- Bloom plugin is backed by a very strong team who knows WordPress in and out.
- The product is evolving with time, and new features are getting added continuously.
- You get access to other awesome products like Divi Theme, Monarch plugin when you buy this plugin.
- This plugin is easy to use and comes with the user-friendly admin interface.
- It offers you great flexibility regarding placement.
No matter what kind of site you are managing, collecting email from the first day is very important because a huge percentage of your first-time visitors will never return to your site.
Once you have a strong email list, you can send them the best offers and your important content so that you can increase your daily traffic and overall revenue.
Getting Started With Bloom
The Bloom plugin is quite simple and easy to get started with. It comes with a comprehensive admin interface, and most of the options are self-explanatory.
Once the purchase process is complete, you will get the option to download the plugin. Just upload the plugin in the WordPress admin plugins >> add new and install it.
After you activate the plugin, you will get the Bloom plugin option in the WordPress admin. Click on the option to go to the Bloom dashboard.
The dashboard you have the option to create a new opt-in, you just need to select the opt-in you want for your site and get started with the customization.
Set-Up First Email Opt-in With Bloom
The process of setting up your email opt-in form with Bloom is simple and quick. As mentioned above, you will get the Bloom option on your WordPress admin dashboard.
For testing purpose, we are set up using the Bloom plugin on our Lifenicks site. Let’s have a look at the step-by-step process to set up the first opt-in.
Select the opt-in type that you want to use for your site, here we are selecting the pop-up option.
In the next screen, you will get the option to select the email service provider from the long list of options. If you are a new user, I recommend you to go to MailChimp as they offer free services up to 2000 emails.
Then you select the MailChimp account and the email list where you want to store the email you are going to collect. Once you are done with these options, you can click on the design your opt-in option to fine-tune the design of your form.
Here you get ready to be used templates that you can use on your site. Select the one you like and scroll down; there you will see two options, save and exit or customize further.
Let’s see what’s there in the further customization modules.
We have selected the first default template option and clicked on the customize option. There are different options on this screen; we will have a look at them one by one.
The first two options are straight and simple. You can add the main title for your opt-in form and the message you want to display on your form.
If you are offering any discount or any special offer, you can explain that here.
Next option is the image on your opt-in form. For example, if you are offering any free eBook to the email subscribers; you can showcase the image of your eBook here.
There are some different animations to choose from, select the one you like and move forward.
The next set of options are for styling your opt-in form. Here you can select the background color for your form, the font option, and a few other styling elements.
Another important thing that is worth mentioning here is the custom CSS option. If you wish to style your Bloom opt-in form in a custom way, you can get done easily by adding the custom CSS here.
Once you are done with the styling option, click on the display settings button that will take you to the next screen with the display settings.
Here you can setup how and when you wish to display the pop-up to your visitors. There are some important settings on this screen such as, you can set the display animation when you wish to trigger the pop-up, you can hide it on mobile devices.
You also have the option to select the taxonomies and categories where you wish to display or hide.
Done with the display settings, click on the success action button. Here you can set-up what you want to achieve after the user takes action and provides you the email ID.
You can show a success message, or you can redirect the user to a custom page.
Bloom Display Types
Bloom is one of the most comprehensive email capturing plugins for WordPress, and it offers you more than one display option.
You can select the one that you think will work perfectly for your site and move ahead with the customizations as mentioned above.
Let’s have a look at the display options.
#1. Automatic Opt-In Pop-Up
Pop-up is one of the most widely used email opt-in type at the moment. Though the pop-ups can be annoying at times, a nicely done email opt-in pop-up can do wonder for your site.
Most of the pro bloggers use pop-ups quite effectively and recommend as one of the most effective email opt-in type.
Settings up a pop-up with Bloom is straight and easy; you just need to follow the process mentioned above in this post.
There are some different options when you sit to trigger the pop-up. You can show the form after an interval, after inactivity, at the bottom of the post, after scrolling certain percentage of the page, after purchase, etc.
#2. Automatic Opt-In Fly-Ins
Similar to the pop-ups, the fly-in option also is very effective in getting your visitor’s attention. You can also set when you wish to trigger the fly-in similar to the pop-up settings.
#3. Inline Opt-In Forms
This is another very important opt-in type. You just have seen lead generation forms inside a post which can be a very effective placement because certain people will immediately give you their email if they find your content useful.
So, making it easier for them is important. Bloom offers you shortcode option for the inline opt-in type so that you can place them wherever you wish to.
#4. Below Content Opt-In Forms
This option is similar to the inline opt-in option. You can place the opt-in email form below your blog posts to maximize the conversion.
#5. Widget Area Opt-In Forms
Placing an opt-in email widget is extremely important for every blog. Even if you are using any of the other opt-in types such as pop-up, you must have a fixed email lead generation widget in the sidebar of your site.
#6. Require Opt-In To Unlock Content
You must have come across content locker plugins. If you are creating high-value content that you are offering for free, this option can be very effective in maximizing opt-in email conversion.
With this option, you can ask your users to submit their email before they get access to the complete content of your post.
We have already listed some of the best content locker WordPress plugins in this post where you will find a few more options that are quite effective.
Over 100 Pre-designed Templates
115 ready to be used templates to be precise are available to get started quickly. That’s a huge number for an email opt-in plugin; so you get almost any kind of design you are looking for.
Though the number of huge, you don’t have to stick to the readily available templates because you can easily create your design or customize the one you have selected.
Form Orientations
Depending on the placement of your opt-in form, you have different orientation options to choose from. You can make it horizontal or vertical to make sure it looks good and fits n perfectly.
Image Orientation Options
Similar to the form orientation, you have the option to select the image orientation on your form. Here we are talking about the image that you are using on the form like the eBook image if you are offering free eBook.
Border Styles
When it comes to design the small things can make a big difference. The border design of your form is one such thing can quickly enhance the overall look and feel of the form.
Unlimited Color Options
Bloom offers you unlimited color options to style your email opt-in form to make sure that the form complements your site perfectly.
We have talked about the color selecting option in the styling settings above in the post. You can select the color for the form background; the submit button, etc.
Highly Targeted Display
When and what you display on your site can make a big difference to conversion. Bloom plugin offers you highly targeted display option.
You have the option to create unlimited email opt-in form and target them differently. For example, if you are created a big SEO related post, a targeted opt-in with some amazing SEO related offer will work the best.
So, you can set-up your email opt-in form for various offers and options depending on your content type.
A/B Testing
A/B testing is very important for any lead generation campaign because if you test different options then only you will understand what is working what is not.
Bloom offers you split testing lets you compare the performance of multiple variations of the same opt-in form.
You can set-up the testing for different options which are based on triggers, placement, and design of the form to make sure the one that is perfect.
Opt-in Statistics
Bloom offers you the statistics option in the admin panel so that you are always updated with what is working on your site and what is not. You can keep track of the performance after every change so that you can fine-tune the form for maximum conversion.
Email Marketing Services Integrations
Bloom lead generation plugin offers you the option to integrate your form with most of the leading email marketing service providers.
Bloom currently offers you the option to link your form with 16 leading providers that include MailChimp, AWeber, GetResponse and more.
Track Accounts
This is another amazing feature of Bloom plugin. It offers you the option to link more than one email marketing account to your Bloom dashboard. In fact, you have unlimited option to add different marketing accounts.
Bloom will organize all the accounts nicely for your in the Bloom dashboard and it will also show you the aggregate email counts from different accounts.
Now the question is, why do you need more than one account?
The answer could be different for different users. MailChimp offers a free account to 2000 users, so someone might opt for that privilege at the same time they can use different service for other existing lists.
Also, if you are in the testing more to try out different email marketing options, price wise or for any other reason, this feature of Bloom will be extremely effective.
Responsive Design
Bloom is a fully responsive plugin to make sure that your email opt-in forms look great on all devices. The front-end form and the Bloom dashboard is fully responsive.
Customized Borders & Edges
You have the option to select customized borders and edges that will make your form look trendy.
Pricing
ElegantThemes works on a membership-based model, so you get access to Bloom plugin as well as all other products from the store for just $89.
Final Verdict
We have been using this plugin in some of our blogs, and it Works perfectly. Bloom is undoubtedly a great plugin that will surely boost your email list.
The settings are easy to understand and even a complete newbie will not face any difficulty, and there are many tutorials available for Bloom plugin for the basic set-up as well as advanced custom designs.
Another important aspect to look at is the team behind this product, ElegantThemes is in the WordPress business for a long time, and they create well-coded products, so your site will be in safe hands.
Also, you get access to some of the top quality products like the Divi Theme, the Monarch Plugin, the Extra Themewhen you purchase this plugin.